Thursday, October 24, 2013

Continuing Work

I have been burning piles of dead wood, brush, and old wood that is so spongy and dry that you can barely carry it without it crumbling into a pile of wood dust.

Last week the family was here too, so we roasted hot dogs and made smores.  Eventually we gave up on the graham crackers and just focused on the marshmallows and chocolate.


The individual above ate the majority of the bag of marshmallows.  Good thing he had a lot of exercise that day.

We continue to find treasures.  This is a really large metal wheel about 3' in diameter.  Unfortunately I don't have anything in the picture for scale.  It is very heavy and will take some work to get it propped up for another picture. When I do, I will add something for scale.  Until then, it needs to dry out so we can get the mud/dirt out of it.


I have also made more piles.  I asked the neighbor if he wanted some free wood.  He said "Yes", so I said "Great! Bring your chain saw." He showed up and cut through a large amount of dead wood and branches growing toward the road like a rabid beaver through a forest of saplings.  In less than an hour, I had a stack of wood for more than two piles.  The neighbor didn't want the wood.  It wasn't straight enough for splitting.  Apparently I need to learn more about wood quality.


After all that work, my arms were sore and didn't want to operate properly, so I took some time off and made this!


Actually the necklace took less than an hour, but the first time I tried it with supplies from Michael's it didn't work.  So I ordered the proper crimp ends from Fire Mountain Gems... which is AWESOME!!! and the best place to buy things.  Plus they ship super fast.  The picture is a little low rez so not all the details are visible.  


Tuesday, October 01, 2013

The Little Man's Dirt Cake

Mister e requested a dirt cake for his birthday this year.  I fulfilled his request as best as I could:


My mom helped me.  It is actually a sour cream chocolate cake that has been cut up and layered with chocolate mousse.  Technically it is a trifle.  I did not have a trifle bowl which is glass with straight sides... so I made do with this.


The top is crushed chocolate wafers.  What would the world do if Nabisco stopped manufacturing these things?!?!?  There is an assortment of gummy worms and gummy spiders and chocolate candied rocks.


The dirt cake was for the kid party.  I made a small, blue gravel cake for the family party.


... sort of an earthy cake theme this year.

Friday, September 27, 2013

Stump Removal and Tractors

 So what happened between these two pictures?
Before

After
We brought down the Caterpillar to drag out a stump.  It overheated on the way down.  It wouldn't start the next day.


So then we brought down another tractor- the HD11 (orange one).  Dad used the HD11 to pull out the Caterpillar (yellow one) so we could jump start it.  Once it was started (and filled with plenty of radiator fluid), we left both tractors running (just in case either wouldn't start again) and drove the Caterpillar back to the shop for maintenance.  It overheated again.


Then we used the HD11 to finally get that stump out.  It is a small stump for so many tractors.


However..... on the way back to the shop, the exhaust pipe came into contact with an over hanging branch.


It is not supposed to be bent at the that angle... not even for aerodynamics.  Eventually it just came off.


It now has a brand new exhaust pipe.... but now won't start.  Good thing we got that stump out.

Have you ever seen one tractor pulling another?  Watch this video and see it in action!


Sunday, September 15, 2013

More cleaning and pile making

Continuing work on my project down the road.... I make many piles of brush and tree parts.  It looks like some rare dry-land beaver is building air dams across the property providing a series of wind breaks that it can scurry between.  The piles have to be small enough and far enough apart that they can be burned individually (later in the fall) without everything going up at once.

Sometimes my dad helps me.  He is on the wheel tractor... dragging a section of the roof.


Treasures from the ground...  I unearthed these while cleaning out the root cellar.  I can't believe the 2 quart Atlas was in one piece.


This is the interior of the root cellar currently.  I have taken a break from this project for a bit to work on the new driveway opening in the hawthornes, but will be back to continue scooping out dirt and stones and hoping to find more treasures.


This is the new driveway space before....


And this is it after.....

There was a lot of activity and some equipment breaking in between.  That will be an entire post on its own.

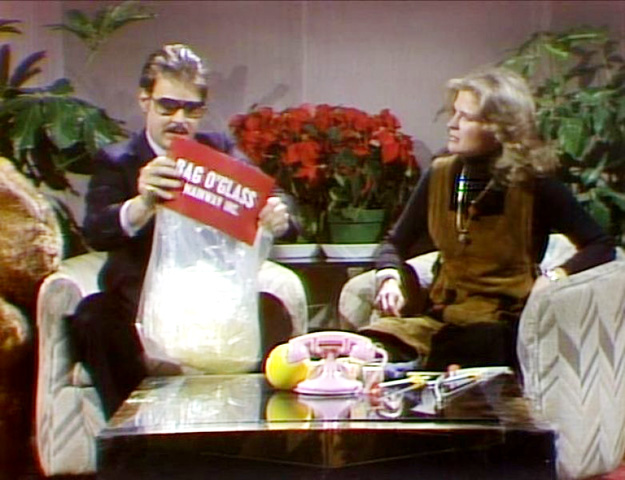
5 gallons of broken glass anyone?  There is a lot of broken glass and metal in the ground.  I couldn't come up with a clever use for this much broken glass...


But I know someone who could....

... Irwin Mainway.

Saturday, September 07, 2013

Not in Portland for the Fall

The blog has been quiet once again.   Always during transitions, I seem to drop off the blogging radar.  August was busy with prep for school for both the kids and me.  I had a lot of work to do on the some of the lesson plans and online learning spaces ahead of Fall semester at the University of Idaho.  But I got it done and passed my motorcycle class at the same time, so I am now officially endorsed!  More on that later.

I am now in Idaho teaching again.  In my spare time, I am working on clearing and prepping some property up here for a future project.  Hint:  The project does not involve a sewing machine.

The work is a lot like Minecraft:

We clear the wood.....


...in Mincraft we get to wear cool iron armor though....


There will be some stones to deal with in the future.  For now we are stacking all rocks by the walls that are remains on the root cellar...


... in Minecraft the rocks are square and stack much more easily.  Again, you get to wear cool armor in Minecraft.  I tore my shirt on a thorn tree.  I wished that I had had iron chest armor.  I do have a hard hat though which is kind of like a helmet.


This is what the property looks like in the spring.  There is somewhere around 40 years of overgrowth that needs to be cleared.  We have opened up all the access roads so we can now get to all the pasture areas for weed and mowing maintenance.  We are now clearing around the house and getting ready to dismantle the house and salvage as much wood as we can.


Fortunately we do not need to mine for iron and make our own iron pickaxes and shovels.  I can find those tools in the garage.


Tuesday, July 23, 2013

Jacket and Buttons

The jacket is together and has been worn once... as referenced by the wrinkles in the pictures.


However, there is a lot of extra room in the back.  More than is needed for wearing over clothes, so I need to take a little in.  Also the sleeves are wider than I wanted, so I will be narrowing those slightly and adjusting the pattern.


I know awhile back I said that I didn't need anymore buttons... but look what I found at the Portland Antique Expo


The blue/green/yellow box was sorted by color until it tipped over in my bag... but it is still pretty.

You might ask where I wore the jacket for wear testing... that would be to a Weird Al concert!!!


He was at the Oregon Zoo.  Amazing show with his great band. He played most of his recognizable hits, but not all.  He did not do "Living With a Hernia" which I really like.  I bought tickets the day they were available.  Go see him... you will smile and laugh the whole time.


Saturday, July 20, 2013

Jacket Progress

I have misplaced my tailoring book(s), so I'm doing most of this from memory.  And this fabric is nothing I would ever use for a true tailored jacket, so I am proceeding with mostly speed/fusible pseudo-tailoring techniques.  Basically anything that will help this floppy, rumply fabric take and hold shape.  I applied fusible interfacing to the fronts up to the roll line.


Double checking things before dropping in the upper collar/facings.  Both the upper and under collars and stands are interfaced.  I have been spending more time in Brooks Brothers and Thomas Pink lately and their collars and cuffs on everything could stand up and serve drinks!  I have a shirt from each maker and have come to appreciate collar and cuff weight interfacing.  They are crisp and smooth and require little pressing after wash.  For this project, I am using a standard medium weight fusible interfacing.  It was on hand, and I wasn't planning on this jacket being smooth and crisp anyway.  There is a collar and cuff weight fusible that I have used for other projects that is superior to this stuff.


I am loving that binder!  Look at the beautiful finished edge on the facing!  I am getting better at cutting bias strips too.  Things still aren't perfect.  The underside of the binding has fabric that is not quite turned under.  I think the binding scroll is too open.  A project for another day.  You would have to dig deep into the garment to see this problem, so I am not sweating it.


With the upper collar/facing pieces applied....


There is some strange bunching at the lower back just above the peplum.  This was not there until I bound the seam allowances on the CB seam.  The binding tension is too tight and has drawn up (taken up) the seam allowances, so things are not lying flat any more.  I will continue to press the heck out of it, but will need to adjust tension for the next jacket if I do the bound seam allowances.


Again... due to the weak hand of the fabric, I interfaced along all the hems.  This is a great technique to use with any fabric that needs a crisp hem but is too weak to do it on its own.  I also bound the raw edge of the hem... which also drew in the width of the fabric and caused some puckering when I sewed the hem in place.  Bad combination of weak fabric and too tight tension on the binding... but I am marching on.


Here is my solution for the body hem.  I applied interfacing to the narrow 1/2" hem.  Then I applied a bias strip that was folded in half and sewn a scant 1/4" to the hem.  Then I pressed the seam allowance down toward the fold and the hem, and then pressed up on the fold of the hem.  The result looks just like the binding but with half the bulk AND this method does not have any puckering along the curved hem.  I hand sewed it into place.


Thursday, July 18, 2013

Discovering Tumblr

I'm a little late to the game with Tumblr.... but I found Stylesight's Tumblr account today..... beautiful.


Wednesday, July 17, 2013

Jacket Project

I usually don't post projects in process because sometimes I get distracted and they don't become completed projects.  But I am determined to finish this jacket because I love all the jackets that I see coming down the runway like at Gautier and over on Burdastyle.


Due to my shape, I rarely find things off the rack that fit me... and when I do they are usually knit... which is not what I want.  I want structure.

I am using Burda 01/2011 Cropped Jacket #127.  I adjusted the pattern using my block that I made last fall, and then cut out a muslin.


The balance looks remarkably good.  My shoulders curve forward or have more depth than those on a traditional pattern block, so oftentimes the garment sits to the back.


I am planning on using a lightweight cotton plaid for the first jacket.  Not a fabric than can be truly tailored with hair canvas and pad stitching, but more of a casual "just throw it on" jacket.  It will sew up fairly quickly and give me a change to check the fit more thoroughly before I move onto more expensive goods.

Since the jacket will be mostly unlined and the seam allowances will be exposed, I thought I would play around with binding some of the seams.  I set up my Singer Slant-o-Matic (you got to love that machine just for the name) and put on the binding foot.


At this point, readers, I would like to point out that one should ALWAYS read ALL the instructions FIRST.  It will save you a tremendous amount of time.  If I would have read everything, I would have cut the bias strip the correct width and been on my way to binding nirvana.  Instead I did a trial and error method that took an hour of fussing about.


Here is the Center Back seam with it's binding.  Lovely!  There is a peplum/back seam that I did not bind.  The binding does add some bulk, so for this jacket I am using a zigzag on the seam allowance edges.  I may wind up pressing the seam allowance down (toward the peplum) and clean finishing it with a facing... not sure yet.  Doing some field designing here.  The pattern calls for a lining, but for this jacket I want to keep it light.


Checking the fit this morning.  I have added the under collar and stand.  I will be applying some fusible interfacing from the edge to the roll line of the under lapel/front.  This fabric has NO BODY what so ever, so this will be a rumply, casual jacket when I'm done.