Showing posts with label sewing. Show all posts

Tuesday, July 23, 2013

Jacket and Buttons

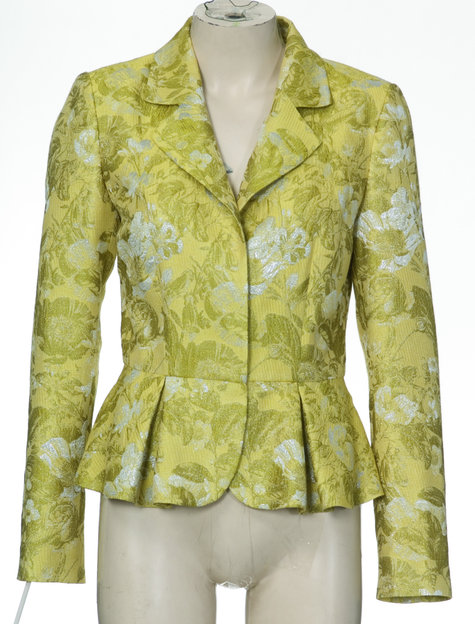
The jacket is together and has been worn once... as referenced by the wrinkles in the pictures.


However, there is a lot of extra room in the back.  More than is needed for wearing over clothes, so I need to take a little in.  Also the sleeves are wider than I wanted, so I will be narrowing those slightly and adjusting the pattern.


I know awhile back I said that I didn't need anymore buttons... but look what I found at the Portland Antique Expo


The blue/green/yellow box was sorted by color until it tipped over in my bag... but it is still pretty.

You might ask where I wore the jacket for wear testing... that would be to a Weird Al concert!!!


He was at the Oregon Zoo.  Amazing show with his great band. He played most of his recognizable hits, but not all.  He did not do "Living With a Hernia" which I really like.  I bought tickets the day they were available.  Go see him... you will smile and laugh the whole time.


Saturday, July 20, 2013

Jacket Progress

I have misplaced my tailoring book(s), so I'm doing most of this from memory.  And this fabric is nothing I would ever use for a true tailored jacket, so I am proceeding with mostly speed/fusible pseudo-tailoring techniques.  Basically anything that will help this floppy, rumply fabric take and hold shape.  I applied fusible interfacing to the fronts up to the roll line.


Double checking things before dropping in the upper collar/facings.  Both the upper and under collars and stands are interfaced.  I have been spending more time in Brooks Brothers and Thomas Pink lately and their collars and cuffs on everything could stand up and serve drinks!  I have a shirt from each maker and have come to appreciate collar and cuff weight interfacing.  They are crisp and smooth and require little pressing after wash.  For this project, I am using a standard medium weight fusible interfacing.  It was on hand, and I wasn't planning on this jacket being smooth and crisp anyway.  There is a collar and cuff weight fusible that I have used for other projects that is superior to this stuff.


I am loving that binder!  Look at the beautiful finished edge on the facing!  I am getting better at cutting bias strips too.  Things still aren't perfect.  The underside of the binding has fabric that is not quite turned under.  I think the binding scroll is too open.  A project for another day.  You would have to dig deep into the garment to see this problem, so I am not sweating it.


With the upper collar/facing pieces applied....


There is some strange bunching at the lower back just above the peplum.  This was not there until I bound the seam allowances on the CB seam.  The binding tension is too tight and has drawn up (taken up) the seam allowances, so things are not lying flat any more.  I will continue to press the heck out of it, but will need to adjust tension for the next jacket if I do the bound seam allowances.


Again... due to the weak hand of the fabric, I interfaced along all the hems.  This is a great technique to use with any fabric that needs a crisp hem but is too weak to do it on its own.  I also bound the raw edge of the hem... which also drew in the width of the fabric and caused some puckering when I sewed the hem in place.  Bad combination of weak fabric and too tight tension on the binding... but I am marching on.


Here is my solution for the body hem.  I applied interfacing to the narrow 1/2" hem.  Then I applied a bias strip that was folded in half and sewn a scant 1/4" to the hem.  Then I pressed the seam allowance down toward the fold and the hem, and then pressed up on the fold of the hem.  The result looks just like the binding but with half the bulk AND this method does not have any puckering along the curved hem.  I hand sewed it into place.


Wednesday, July 17, 2013

Jacket Project

I usually don't post projects in process because sometimes I get distracted and they don't become completed projects.  But I am determined to finish this jacket because I love all the jackets that I see coming down the runway like at Gautier and over on Burdastyle.


Due to my shape, I rarely find things off the rack that fit me... and when I do they are usually knit... which is not what I want.  I want structure.

I am using Burda 01/2011 Cropped Jacket #127.  I adjusted the pattern using my block that I made last fall, and then cut out a muslin.


The balance looks remarkably good.  My shoulders curve forward or have more depth than those on a traditional pattern block, so oftentimes the garment sits to the back.


I am planning on using a lightweight cotton plaid for the first jacket.  Not a fabric than can be truly tailored with hair canvas and pad stitching, but more of a casual "just throw it on" jacket.  It will sew up fairly quickly and give me a change to check the fit more thoroughly before I move onto more expensive goods.

Since the jacket will be mostly unlined and the seam allowances will be exposed, I thought I would play around with binding some of the seams.  I set up my Singer Slant-o-Matic (you got to love that machine just for the name) and put on the binding foot.


At this point, readers, I would like to point out that one should ALWAYS read ALL the instructions FIRST.  It will save you a tremendous amount of time.  If I would have read everything, I would have cut the bias strip the correct width and been on my way to binding nirvana.  Instead I did a trial and error method that took an hour of fussing about.


Here is the Center Back seam with it's binding.  Lovely!  There is a peplum/back seam that I did not bind.  The binding does add some bulk, so for this jacket I am using a zigzag on the seam allowance edges.  I may wind up pressing the seam allowance down (toward the peplum) and clean finishing it with a facing... not sure yet.  Doing some field designing here.  The pattern calls for a lining, but for this jacket I want to keep it light.


Checking the fit this morning.  I have added the under collar and stand.  I will be applying some fusible interfacing from the edge to the roll line of the under lapel/front.  This fabric has NO BODY what so ever, so this will be a rumply, casual jacket when I'm done.


Tuesday, July 16, 2013

Handkerchief Curtain

Reloved magazine had a great shot of a pieced curtain in their Spring 2013 issue.  


And Mollie Makes featured the book Vintage Home in their issue 28 which also had a pieced curtain but made of vintage scarves.  Both magazines got me thinking about my excessive collection of vintage hankies.  They were originally upcycled into fanciful skirts for toddler girls.  The line was called Patache... hence the reason for starting this blog in the first place.  But that was a long time ago, and I have moved onto other things, but still have lots of hankies.  So I pieced them altogether into a sheer curtain.


The curtain hangs from brass upholstery tacks that are not hammered in all the way.


And what would a home project be without some sort of error or mishap?  It wouldn't be a home project!  I measured and calculated, but missed the mark.  There are two extra holes in the window frame that need filling and touching up.


Overall the end result is colorful and airy and works in the stairway.


Saturday, July 06, 2013

Doll Clothes

I am back from two weeks in Idaho.  My family celebrated our Century Farm status on June 22 with a big party and a presentation of a plaque and sign for the farm.  The farm is 140 years old and for 130 years we have farmed the same land continuously.  To qualify for a Century Farm, the same land must be farmed continuously for 100 years, AND you must be able to prove this with supporting paperwork.

There was lots of yard work, tree removal, pruning, and general prep before the event.  Then my spouse and I flew off to Vegas for a lovely three nights to warm up and relax.  My parents watched the kids during that time which was the BEST anniversary gift ever!!!!  Hint:  you can give us that gift every year and there would be no complaints!

Since the 200 year anniversary of the farm is in 70 years, Mister e has gleefully agreed to arrange the festivities in 2083.  We can all rest easier now that those plans are in place.

 Yesterday, Miss E and I got busy with some doll clothes using this vintage pattern:


This is Molly... in need of some new clothes for summer.


All done!  The blouse has pin tucks and back buttons.  The skirt is a full circle skirt.


The clothing items in this pattern are constructed in the same way an actual garment would be constructed.  The waistband is clean finished and there is a lap opening in the back.  The blouse has clean finished plackets at the back.  Neither piece took long to construct.  It probably took more time to dissect the pattern instructions than to sew.  We just purchased two new McCalls 18" Doll Clothes patterns.  I am curious to see if the attention to detail is still as high.

Mister e said that he wanted a doll too.  We found these on Etsy... which are amazing.  Very few companies do boy dolls.  I wasn't ready to spend over $90 on a doll, so I thought we would go buy a doll at Target and boy-ize it with a haircut, lipstick removal and boy clothes.  However, after we got her out of the box, e has decided to keep her as a girl for now.  We will see how this progresses.

Tuesday, June 11, 2013

Quick Boot Pillow Project

I own a lot of boots.  


I have always admired the stuffed, weighted pillows that some shoe stores put inside the boot shaft when the boot is on display.  This holds up the shaft so you can see the entire boot while shopping; BUT it also prevents creases from forming in the leather from storing boots flopped over.  Another option is to store boots flat in their shoe boxes, but that takes up space.  I decided to make a set of boot pillows for myself.  (I do not know if these are actually called Boot Pillows, but it is descriptive.)


I cut 12"w x 15"h pieces of muslin for each pillow.  Then I folded each rectangle in half so if was 6"w x 15" h and sewed around the edge.  I left an opening in the middle of the seam.


I then stuffed them with polyfill and sewed the opening shut by hand.  I did not weight these at the bottom.  I did not have quick access to lead shot and not enough spare dry beans.


... and inserted them into my boots!  I did remove one set of boots from the pile so it is a bit tidier.


Tuesday, May 28, 2013

Dress Done!

Here it is!  I wound up cutting off about 8" from the length, so it is not quite as vintage-y looking as it could have been, but I think it is more wearable at this length.

There are some discrepancies between the picture on the front of the pattern and the actual dress.  Most noticeably in the sleeve head.  I am going to try pressing the seam allowance into the body to get some of that puff to de-puff.  I even took the sleeves out once and trimmed some off the cap area, but I think I need to reduce the width of the sleeve at the cap as well.  This would require a total recut, so I think I will try some seam allowance manipulation and serious pressing before I take it apart again.  Also the bodice is more poofy that I thought it would be.  It has tucks at the waist rather than darts.  Again, the pattern picture that I found is much more smooth.  Also the model appears to have a 19" waist and sloping shoulders which probably helps the overall proportions.  So not my shape.


I agonized over the button choices and have to resist the urge to go buy more buttons... which I do NOT need.
Assortment of grey/green

Pearly?
Love the hot pink....
Not enough of the roses for the whole front
I settled on these large black 4-hole buttons
Unfortunately I didn't quite have enough, so I had to space them out a little farther.  On a women's button front, you need one button in line with the apex of the bust to keep things from gaping.  This is especially true if you are larger busted.  You will notice that I do not have a button at that location on this dress as I ran out of buttons.  I have a snap sewn in the placket at that location.  I have several vintage dresses that use tiny snaps and hook-and-eye closures to keep things closed or flat.